
Building upon a previous Machine Learning Blog post to create personalized avatars by fine-tuning and hosting the Stable Diffusion 2.1 model at scale using Amazon SageMaker, this post takes the journey a step further. As technology continues to evolve, newer models are emerging, offering higher quality, increased flexibility, and faster image generation capabilities. One such groundbreaking model is Stable Diffusion XL (SDXL), released by StabilityAI, advancing the text-to-image generative AI technology to unprecedented heights. In this post, we demonstrate how to efficiently fine-tune the SDXL model using SageMaker Studio. We show how to then prepare the fine-tuned model to run on AWS Inferentia2 powered Amazon EC2 Inf2 instances, unlocking superior price performance for your inference workloads.
Solution overview
The SDXL 1.0 is a text-to-image generation model developed by Stability AI, consisting of over 3 billion parameters. It comprises several key components, including a text encoder that converts input prompts into latent representations, and a U-Net model that generates images based on these latent representations through a diffusion process. Despite its impressive capabilities trained on a public dataset, app builders sometimes need to generate images for a specific subject or style that are difficult or inefficient to describe in words. In that situation, fine-tuning is a great option to improve relevance using your own data.
One popular approach to fine-tuning SDXL is to use DreamBooth and Low-Rank Adaptation (LoRA) techniques. You can use DreamBooth to personalize the model by embedding a subject into its output domain using a unique identifier, effectively expanding its language-vision dictionary. This process uses a technique called prior preservation, which retains the model’s existing knowledge about the subject class (such as humans) while incorporating new information from the provided subject images. LoRA is an efficient fine-tuning method that attaches small adapter networks to specific layers of the pre-trained model, freezing most of its weights. By combining these techniques, you can generate a personalized model while tuning an order-of-magnitude fewer parameters, resulting in faster fine-tuning times and optimized storage requirements.
After the model is fine-tuned, you can compile and host the fine-tuned SDXL on Inf2 instances using the AWS Neuron SDK. By doing this, you can benefit from the higher performance and cost-efficiency offered by these specialized AI chips while taking advantage of the seamless integration with popular deep learning frameworks such as TensorFlow and PyTorch. To learn more, visit our Neuron documentation.
Prerequisites
Before you get started, review the list of services and instance types required to run the sample notebooks provided at this GitHub location.
By following these prerequisites, you will have the necessary knowledge and AWS resources to run the sample notebooks and work with Stable Diffusion models and FMs on Amazon SageMaker.
Fine-tuning SDXL on SageMaker
To fine-tune SDXL on SageMaker, follow the steps in the next sections.
Prepare the images
The first step in fine-tuning the SDXL model is to prepare your training images. Using the DreamBooth technique, you need as few as 10–12 images for fine-tuning. It’s recommended to provide a variety of images to help the model better understand and generalize your facial features.
The training images should include selfies taken from different angles, covering various perspectives of your face. Include images with different facial expressions, such as smiling, frowning, and neutral. Preferably, use images with different backgrounds to help the model identify the subject more effectively. By providing a diverse set of images, DreamBooth can better identify the subject from the pictures and generalize your facial features. The following set of images demonstrate this.


Additionally, use 1024×1024 pixel square images for fine-tuning. To simplify the process of preparing the images, there is a utility function that automatically crops and adjusts your images to the correct dimensions.
Train the personalized model
After the images are prepared, you can begin the fine-tuning process. To achieve this, you use the autoTrain library from Hugging Face, an automatic and user-friendly approach to training and deploying state-of-the-art machine learning (ML) models. Seamlessly integrated with the Hugging Face ecosystem, autoTrain is designed to be accessible, and individuals can train custom models without extensive technical expertise or coding proficiency. To use autoTrain, use the following example code:
!autotrain dreambooth \
--prompt "${INSTANCE_PROMPT}" \
--class-prompt "${CLASS_PROMPT}" \
--model ${MODEL_NAME} \
--project-name ${PROJECT_NAME} \
--image-path "${IMAGE_PATH}" \
--resolution ${RESOLUTION} \
--batch-size ${BATCH_SIZE} \
--num-steps ${NUM_STEPS} \
--gradient-accumulation ${GRADIENT_ACCUMULATION} \
--lr ${LEARNING_RATE} \
--fp16 \
--gradient-checkpointing
First, you need to set the prompt and class-prompt. The prompt should include a unique identifier or token that the model can reference to the subject. The class-prompt, on the other hand, is used to subsidize the model training with similar subjects of the same class. This is a requirement for the DreamBooth technique to better associate the new token with the subject of interest. This is why the DreamBooth technique can generate exceptional fine-tuned results with fewer input images. Additionally, you’ll notice that even though you didn’t provide examples of the top or back of our head, the model still knows how to generate them because of the class prompt. In this example, you are using <<TOK>> as a unique identifier to avoid a name that the model might already be familiar with.
instance_prompt = "photo of <<TOK>>"
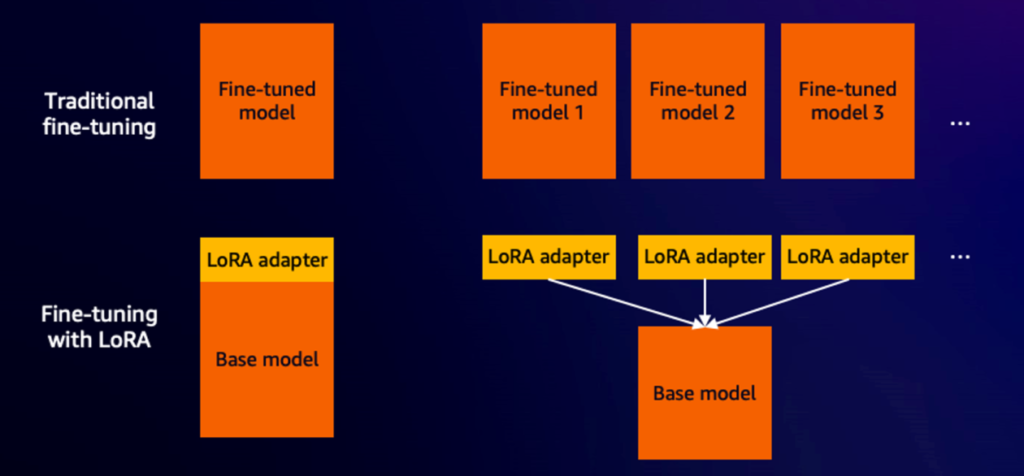
class_prompt = "photo of a person"Next, you need to provide the model, image-path, and project-name. The model name loads the base model from the Hugging Face Hub or locally. The image-path is the location of the training images. By default, autoTrain uses LoRA, a parameter-efficient way to fine-tune. Unlike traditional fine-tuning, LoRA fine-tunes by attaching a small transformer adapter model to the base model. Only the adapter weights are updated during training to achieve fine-tuning behavior. Additionally, these adapters can be attached and detached at any time, making them highly efficient for storage as well. These supplementary LoRA adapters are 98% smaller in size compared to the original model, allowing us to store and share the LoRA adapters without having to duplicate the base model repeatedly. The following diagram illustrates these concepts.


The rest of the configuration parameters are as follows. You are recommended to start with these values first. Adjust them only if the fine-tuning results don’t meet your expectations.
resolution = 1024          # resolution or size of the generated images
batch_size = 1             # number of samples in one forward and backward pass
num_steps = 500           # number of training steps
gradient_accumulation = 4  # accumulating gradients over number of batches
learning_rate = 1e-4       # step size
fp16                       # half-precision
gradient-checkpointing     # technique to reduce memory consumption during training
The entire training process takes about 30 mins with the preceding configuration. After the training is done, you can load the LoRA adapter, such as the following code, and generate fine-tuned images.
from diffusers import DiffusionPipeline, StableDiffusionXLImg2ImgPipeline
import random

seed = random.randint(0, 100000)

# loading the base model
pipeline = DiffusionPipeline.from_pretrained(
    model_name_base,
    torch_dtype=torch.float16,
    ).to(device)

# attach the LoRA adapter
pipeline.load_lora_weights(
    project_name,
    weight_name="pytorch_lora_weights.safetensors",
)

# generate fine tuned images
generator = torch.Generator(device).manual_seed(seed)
base_image = pipeline(
    prompt=prompt,
    negative_prompt=negative_prompt,
    num_inference_steps=50,
    generator=generator,
    height=1024,
    width=1024,
    output_type="pil",
    ).images[0]
base_image
Deploy on Amazon EC2 Inf2 instances
In this section, you learn to compile and host the fine-tuned SDXL model on Inf2 instances. To begin, you need to clone the repository and upload the LoRA adapter onto the Inf2 instance created in the prerequisites section. Then, run the compilation notebook to compile the fine-tuned SDXL model using the Optimum Neuron library. Visit the Optimum Neuron page for more details.
The NeuronStableDiffusionXLPipeline class in Optimum Neuron now has direct support for the LoRA. All you need to do is to supply the base model, LoRA adapters, and supply the model input shapes to start the compilation process. The following code snippet illustrates how to compile and then export the compiled model to a local directory.
from optimum.neuron import NeuronStableDiffusionXLPipeline

model_id = "stabilityai/stable-diffusion-xl-base-1.0"
adapter_id = "lora"
input_shapes = {"batch_size": 1, "height": 1024, "width": 1024, "num_images_per_prompt": 1}

# Compile
pipe = NeuronStableDiffusionXLPipeline.from_pretrained(
    model_id,
    export=True,
    lora_model_ids=adapter_id,
    lora_weight_names="pytorch_lora_weights.safetensors",
    lora_adapter_names="sttirum",
    **input_shapes,
)

# Save locally or upload to the HuggingFace Hub
save_directory = "sd_neuron_xl/"
pipe.save_pretrained(save_directory)
The compilation process takes about 35 minutes. After the process is complete, you can use the NeuronStableDiffusionXLPipeline again to load the compiled model back.
from optimum.neuron import NeuronStableDiffusionXLPipeline

stable_diffusion_xl = NeuronStableDiffusionXLPipeline.from_pretrained("sd_neuron_xl")
You can then test the model on Inf2 and make sure that you can still generate the fine-tuned results.
import torch
# Run pipeline
prompt = """
photo of <<TOK>> , 3d portrait, ultra detailed, gorgeous, 3d zbrush, trending on dribbble, 8k render
"""

negative_prompt = """
ugly, tiling, poorly drawn hands, poorly drawn feet, poorly drawn face, out of frame, extra limbs, disfigured, deformed, body out of frame, blurry, bad anatomy, blurred,
watermark, grainy, signature, cut off, draft, amateur, multiple, gross, weird, uneven, furnishing, decorating, decoration, furniture, text, poor, low, basic, worst, juvenile,
unprofessional, failure, crayon, oil, label, thousand hands
"""

seed = 491057365
generator = [torch.Generator().manual_seed(seed)]
image = stable_diffusion_xl(prompt,
                    num_inference_steps=50,
                    guidance_scale=7,
                    negative_prompt=negative_prompt,
                    generator=generator).images[0]
Here are a few avatar images generated using the fine-tuned model on Inf2. The corresponding prompts are the following:
- emoji of << TOK >>, astronaut, space ship background
- oil painting of << TOK >>, business woman, suit
- photo of << TOK >> , 3d portrait, ultra detailed, 8k render
- anime of << TOK >>, ninja style, dark hair


Clean up
To avoid incurring AWS charges after you finish testing this example, make sure you delete the following resources:
- Amazon SageMaker Studio Domain
- Amazon EC2 Inf2 instance
Conclusion
This post has demonstrated how to fine-tune the Stable Diffusion XL (SDXL) model using DreamBooth and LoRA techniques on Amazon SageMaker, enabling enterprises to generate highly personalized and domain-specific images tailored to their unique requirements using as few as 10–12 training images. By using these techniques, businesses can rapidly adapt the SDXL model to their specific needs, unlocking new opportunities to enhance customer experiences and differentiate their offerings. Moreover, we showcased the process of compiling and deploying the fine-tuned SDXL model for inference on AWS Inferentia2 powered Amazon EC2 Inf2 instances, which deliver an unparalleled price-to-performance ratio for generative AI workloads, enabling enterprises to host fine-tuned SDXL models at scale in a cost-efficient manner. We encourage you to try the example and share your creations with us using hashtags #sagemaker #mme #genai on social platforms. We would love to see what you make.
For more examples about AWS Neuron, refer to aws-neuron-samples.
About the Authors


